Sunday, 22 March 2015

12 Tags of Tim Holtz -March 2015

Hello Everyone

Having enjoyed participating in The 12 tags of Tim Holtz last month I was ready to join in again this month . 

For March, Tim wanted us to create a tag to encourage our creative mind to wander and play, whether it be by trying new combinations of colour, using new imagery or combing random elements - just explore, imagine n discover!   


Tim's March tag n tutorial can be found here n as I LOVED what Tim had created I decided to keep mine very similar following the techniques given but playing around with colour and embellishments mainly n adding a touch of dimension to the beautiful butterfly stamp!  
So the distress paint colours I chose for my tag were a mix of my usual faves - chipped sapphire and  salty ocean combined with some I don't use that often- spun sugar , seedless preserve n one I've hardly ever used due to a personal 'fear' of 'vibrant' (lol) pickled raspberry .
Following Tims Tute I attached a few strips of tissue tape randomly on the tag n then created my background colour. Once the paint was dry I added some layers n  extra detail with a few texture stamps n stencils. I also added some random circles with paint n a lid top n white speckles using picket fence distress paint flicked from a brush .


I then stamped n embossed two of the gorgeous butterfly one stamped half on, half off the tag n the other one stamped on a spare piece of card . Once they were both dry I painted inside the segments of the butterfly on the tag (from the outside in) with salty ocean blending into seedless preserve n picked raspberry n then did exactly the same on the spare butterfly using inks instead of paints .


I kept my embossed  stencilling the same as Tims but thought silver embossing powder would work  better with my combination of colours .


Now for the extra butterfly I had stamped, embossed n inked - I cut this out entirely but then cut away the outer part of the left side of the wing leaving only the inner part of the wing. I wanted to create a sense of 'imperfection' to the butterfly!


I then manipulated the butterfly with my fingers n lined it up on top of the butterfly I'd embossed on the tag n adhered in place leaving the 'imperfect wing' to stand free of the tag. I inked up a pen nib with silver alcohol ink n used it to create the body of the butterfly!


My final touches were some chicken wire n washers with a sentiment token attached to a few complimenting coloured threads looped back on them selves to create a tie. 

Here are a few photos of my March 2015 tag taken from various angles 


I really enjoyed creating this tag, allowing my creative mind to play n wander outside my usual 'comfort zones' even embracing a little 'imperfection' along the way ! hahaha

As well as entering this into Tim Holtz 12-tags of 2015- March

Thanks so much for visiting today and for all the times you've popped by in the past . Your visits never go unnoticed n are much appreciated as are all the wonderful comments you so often leave for my creativity. 
Hope you all have a lovely week ahead doing at least a little bit of something that makes ya heart happy! 
see ya again soon x


Saturday, 14 March 2015

A card for Mum!

Hey up ( as we say here in Yorkshire ) 
Thank you so much for popping by once again to see what creative fun I've been having. Thanks must be offered too for all the very kind comments that were left on my last post! They are so much appreciated n really do make the 'process' worthwhile !

As we are all more than aware today is Mothers Day here in the UK n as I am one of the lucky ones to have my mum around I thought I would  channel my creativity into making Mum a special card !
After much thought about the style of card I would make - Mum likes 'Cutie' card (ughh-  not really my thing !)  I like dark n grungy (mum doesn't quite 'get' that!) I opted for a simple, clean card that showcased something Mum loves - flowers !


As its a simple card there isn't such a deal to say about the making of it so I will keep the write up brief.

I began by stamping my chosen flower stamp (taken from Wendy Vecchi's stamp set 'The beauty of Art' ) twice onto watercolour paper using archival ink n then  I painted the flower heads in Abandon Coral Distress ink n the stem n leaves in Forest Moss .Once dry I cut them out, one in its entirety n the other just the flower head n individual leaves .


I coated the individual leaves with a thin layer of crackle n left to dry!


This stamp really is fabulous - so much detail. It could easily stand alone without colouring or I'm sure would look real classy embossed with an ultra fine powder - Think I'll give that a go another time !
Needless to say such a detailed stamp needed to be the 'star of the show'  so the clean n simple card I had decided to make was the perfect setting !

On a piece of cream card cut to the required size I stamped a very simple border using the squiggle stamp (from the same set) about 1cm up from the bottom edge after which I caught the edges of the card lightly with Abandoned Coral then adhered the full flower centrally keeping it flat to the card . To create some dimension I manipulated the extra flower head n leaves with my fingers n adhered using dimensional glue .


I chose a sentiment that used a simple font - again not wanting to take anything away from the flower . Its on another of Wendy's lovely stamp sets 'Wildflower Art'. I stamped it onto a strip of cream card n again caught the edges with abandoned coral .


As you may have guessed from the photos so far I mounted the cream card onto brown n then mounted both onto a 6x6 card I had cut to size earlier. A few colour coordinating gems were added to either side of the sentiment for the finishing touch!


An easy card for anyone to make admittedly  -probably the hardest part was actually keeping the cream card clean n crisp throughout-(for me anyway) but it was made with extra special love n thanks for My Mum n hopefully she will like it !

Hope to see you again in the coming week as I have a few monthly challenges in mind that I want to enter but for now take care n enjoy your Sunday !

I would like to enter this card into 

Tuesday, 10 March 2015

Springtime!

Hello Everyone!
Hope you all had a great weekend n managed to spend some time getting inky n enjoying the lovely sunshine n warmer temps we were blessed with! Certainly was good to feel 'the heat'!

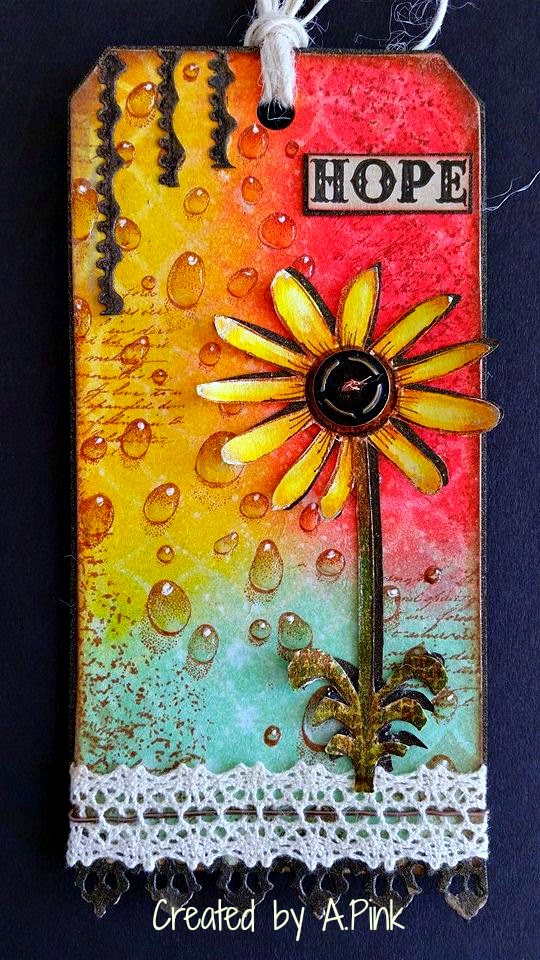
So with spring upon us I have made another tag that I hope portrays some elements of this season using distress inks, stencils n some of my fave stamps, not forgetting the embellies too .
(Please forgive me for the lack of step by step photos I can get too carried away with the making sometimes hahaha ) 

Having added the new distress ink colours to my stash I thought it only right to give them a 'airing' so to speak, so my colour palette for the tag was cracked pistachio, abandoned coral n squeezed lemonade with walnut stain to darken the edges. I applied the ink to separate areas of the tag n then blended them into each other. (Always love seeing these inks when they blend into each other n the new tones that are created!)
I then spritz with water dabbing any excess off with a paper towel just to give some more interest to the colours! 

My choice of stencil for this tag was Tim Holtz 'Latticework' layering stencil which I worked all over the tag using the same colours I had used for the background but were applied with a little more effort to  create a greater depth of colour which would ultimately reveal the stencil marks when lifted!  Admittedly its very subtle but I think it works!


A script stamp n speckle stamp were then stamped randomly on areas of the tag with coffee archival ink! 

Now it was time for the main stamping n for this I used the Flower from the stamp set 'Art in Bloom' by Wendy Vecchi- such a lovely set as are so many of Wendy's stamps.
I stamped it onto spare card n painted it using forest moss, mustard seed n rusty hinge distress inks n water. Once dry i simply cut it out n added some fine detail to the petals! Yet again i found myself creating a darker shadow from brown card to help give the flower dimension once it was mounted! 

Back to the tag itself n after faffing around with placement of the flower I felt the tag needed a little something else so another stash rummage led me to my fantastic water droplet stamp by Designs by Ryn Perfect! My thinking being that it would represent the April showers of spring which help all our beautiful flowers grow ! After stamping I used glossy accents to enhance the droplets giving them a real impression of water! To finish the background off I spritz lightly with cosmic shimmer n caught the edges with gilding wax!


Using Tim Holtz 'Vintage lace' decorate strip die I cut a lace edge from  brown shimmer card n attached it to the bottom of the tag. Above which I placed a length of lace intertwined with brown wire . I then placed the  flower n its shadow on the tag, curled the petals to give the flower head some further dimension n used a metal button threaded with wire to create the centre of the flower!


Not one to waste I used some of the lace die offcuts of varying lengths caught with wax to create a little more interest to the top left corner of the tag . My final touches were a simple adage tag cut to size, mounted, then adhered to the tag n some 'natural twine looped back on itself to create a tie .


Hope you like my 'nod to spring' as much as I  enjoyed creating it ! 


Thanks again for stopping by n  until my next post I wish you all a great week . See ya later!
  

Most of the products i used to make this tag are usually carried by countryviewcrafts

                                               I would like to enter this tag into the following challenges

                                                         Inspiration Journal - Spring Blooms                                                                          The Craft Stamper -Take it , Make it Challenge - March 'Anything goes'                                                                        Country View Challenges March ' Anything goes ! '


Sunday, 8 March 2015

Go Green!


Hello
Really sorry I went awol over the last couple of weeks but thank you for your patience  - it is appreciated as are all the visits you make n all the lovely comments you leave me for my creativity ! You always make me smile!


So what have i been up to ..... Well after enjoying making Tim's tag for Feb 2015 I decided to make a few more tags as its something I haven't done much of in the past .

Here's the first one which is kinda apt with me going MIA ! 


Yet again I set out with no real plan or design other than knowing I wanted to use 'Green' so I could join in with one or two of the challenges that are up n running at the mo .

So out came the distress paints, stencils , stamps n waxes n play (uh um, I mean creativity ) began .

I applied mowed lawn, forest moss, peeled paint , crushed olive n bundled sage distress paints on to my craft mat , spritz them with water to activate the water-reactive properties of the paint and then swiped the tag through the paints to cover . I then quickly spritz the painted tag with water to make the paints react and blend more. After heat drying I repeated the process using just a couple of the paint colours this time n adding tarnished brass into the mix . It was great seeing how that reacted when spritzed with water  - kinda looked like it was 'fizzing'!

Once completely dry, the background I had created reminded me of 'army' colours which conjured up happy memories I have of the many years I spent wearing those ever so comfy army trousers n Doc Martin Boots ( the height of fashion back then hahaha) so that swayed the direction my tag was going to take n it would also give me the opportunity to use one of my fave stamps too!

I stenciled onto the tag randomly using Tim Holtz Cargo stencil, Gathered Twigs n Walnut stain distress inks.
I then did a bit of light stamping using coffee archival (stamped off first onto paper) a number stamp n an arrow stamp I had in my stash .
Time for a bit of grunge next (as I was into the whole 'Grunge' thing too back in my heyday lol ) After mixing some texture paste with vintage photo distress reinker I applied it to the tag working it through Tim Holtz burlap stencil in a rugged kinda way. Once dry I finger touched the stenciling and caught the edges of the tag with gilding wax ! A quick spritz of walnut stain distress spray helped finish off the background .


Using my combat boot stamp by Deep Red  I stamped the boots using Coffee archival, cut them out n worked some walnut stain distress ink to give deeper colour in areas of shadow- this helped give the boots more perspective . I made a dark brown shadow out of card as this I thought would give the boots more dimension when mounted on the tag .


Finally the tag was brought together by adhering all the elements - the shadow, the boots n a rusty old flange to create a surround to the tag hole ! 


  Some jute was wound round the tag a few times n then tied in the centre with a muse token to embellish ! More jute was cut to length n double backed through the rusty washer  to create a hanger !  


Though I had no idea where I was going with this tag from the onset I  enjoyed creating it especially recalling all those happy memories of my younger years n knowing how lucky I am now to be able to reflect on them with fondness.

Thanks for taking the time to stop by n hope to be back later with my second tag . Would be lovely to see you then.

                                                          I would like to enter this tag into the following challenges

Art with Heart Challenge March “Go Green”