Thursday 28 May 2015

12 Tags of Tim Holtz - May 2015


Hi there, 
a little later than I had hoped n only just in time for the deadline ( where has this month gone ?? ) I'm here to share my take on the 12 Tags of Tim Holtz - May 2015. 

This months tag was about using a combination of elements- texture, photos, ephemera, flowers n embellishments to create a sense of nostalgia . You can see Tims version by clicking on the link above .

I followed Tims Tutorial for the most part but had to make a few changes, mainly due to a lack of some of the supplies needed .  

So heres what I did - focusing particularly on the elements I changed!

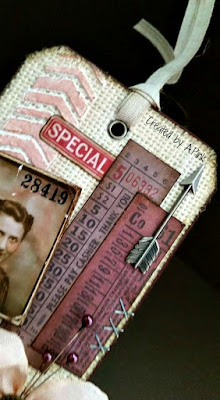
I covered my tag in a creamy coloured jute using double side adhesive sheet. I used texture paste through the chevron layering stencil . At this point I I decided that my tag was to have a feminine feel so I inked over the dry texture paste with Victorian Velvet Distress Ink . I inked the edges of the tag with  Brushed Corduroy n Walnut Stain Distress Ink aswell as applying a very light touch of the brown inks  over the jute to give a more aged appearance to the finished tag .


then selected a photo of a very 'well kempt'  young lady n some ephemera  and followed Tims direction painting in a touch of colour, adding remnant rubs to the photo and adhering them to the background. I embellished with a few mini staples down one side of the ephemera n an ideology arrow .


My crinkle ribbon was created in the same way as Tim had shown in the tutorial  n once tied around the tag I adorned with three bead pins and a small brass button sewn to the centre of the bow. I decided to mount my quote onto brown card leaving only a very thin border which I then scuffed round the edges, again to give an aged effect! 
As I  don't have the lovely Tiny Tattered florals thinlits die I resorted to my other flower dies and then remembered I had a stash of pre cut flowers -ya know the ones that ya cut for other projects and  don't end up using but WON'T throw away because they WILL come in for something, someday hahaha !
Well it just so happened that today was that day n the tag was that something - So I used a spiky flower from the stash inked it  with Victorian Velvet and Walnut Stain Distress Inks and then combined it with a couple of ideology flowers and adhered them together with a brad. 
I then place a memo pin underneath the flower to create a 'kind of stem' for the flower n adhered in place.

All that remained was fixing an eyelet in place to finish off the hole in the top of the tag n double threading a length of taupe cotton ribbon through the hole to create a hanger! 

 N here it is My take on Tims tag for May 2015! 
  

Thanks so much for stopping by to view my tag  its always lovely to see you ! 
A big THANK YOU  too for all the fab comments  left for me about Crazy Bird moving in. they really were so much appreciated!! 
Hope to see you again soon  n be sure to have a lovely weekend


Saturday 23 May 2015

Crazy bird moves in .......

Hello and Welcome 
Little ol' me back again to share with you my latest piece of creativity! This month I decided I wanted to join in with A Vintage Journey challenge as I had in mind an idea that I thought suited the 'Spring colours' theme chosen by the the very talented Astrid who's work you can see here

I chose to work with a colour palette of delicate tones of yellow, blue, green n creamy browns as they for me are what come to mind when I think of 'Spring colours'. I have also aimed to retain a crisp, clean fresh to my little project that I personally think comes with 'Spring'.
I created a bird house using Tim Holtz Vintage Cabinet Card dies (Bigz and Mini) and two side panels that I created freehand so the birdhouse, when built would stand independently. 

A few of the die cuts were adhered together for sturdiness n left for inking later (the back wall) Taking one of the dies I emboss it using Tim Holtz Wood Grain embossing folder n then adhered it to another . I created an aperture in them using the mini cabinet card die making sure it didn't cut perfectly down each side. I scored down each side to create two doors. ( the front) 
All the die cuts n side panels were inked lightly using Antique Linen , Scattered Straw , Gathered Twigs Distress Inks. I stencilled n stamped the back wall using Tim Holtz dots layering stencil, a number stamp from the Tim Holtz Bitty Grunge stamp set and a speckle n script stamp using DI's (bundled sage, scattered straw) n archival inks (cornflower blue n black).
Before constructing the birdhouse I needed to find a resident n there was only one place to look - the fabulous Tim Holtz CraZY bird stamp set. I opted for the one that's won many hearts over out there I'm sure - the cute little chubby bird with the little curly tuft ! 
I stamped him using Black Archival, painted him using DI's ( squeezed lemonade, tumbled glass) n dropped some glossy accents into his eyes to make them shine. I then cut him out before stamping my sentiment.
I die cut one of the leaves from Tim Holtz strip die Spring Greenery n painted that using DI's ( Bundled Sage,Cracked Pistachio,Mowed Lawn n Gathered Twigs adding some fine detail to the leaves .
Now it was time to build! I created a perch for Mr CraZY using a wooden skewer cut to size n inserted into holes that I'd made in the two side panels. Mr CraZY was positioned on his perch to get comfy . I then adhered the panels n die cuts together n positioned the sentiment in place, before adorning the birdhouse with the leave die cut, some blue gems n a metal flower and finally making two door handles using washers n brads.


Do hope he's gonna enjoy his new humble abode as much as I did creating it for him! 

Thanks so much for stopping by - as always your visits n all your lovely comments mean alot. Until my next post which I hope will be sooner rather than later I wish you all a lovely weekend n if ya here in the UK a lovely Spring bank Holiday .

As well as entering this project into
I would also like to enter it into 

Hope to see be back soon but until, then 
keep on the happy side 
and 
Take care 
Amanda
x

Sunday 10 May 2015

Night Tree


Hi there ,
 Its a real quick post from me today as I'm against the clock to link up my make for one of the challenges I will be entering it into . Simon Says Stamp - Monday Challenge

After dithering with ideas for some time ( all week !!) I decided to make a card - here it is:

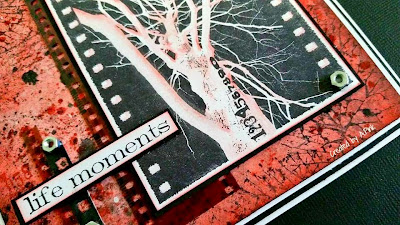
The stamp is by Paperbag studios 'NIght Tree' n personally I love it- n that's where it all began! I Stamped the image n then watercoloured the branches of the tree using Abandoned Coral Distress Ink n once dry mounted onto black cardstock .
I created a background using Abandoned Coral DI n lots of water spritzing, dabbing the colour back with a paper towel. 
I then added detail with some random stamping using black Archival ink n a couple of texture stamps n spritzed with Black Soot n Fired Brick Distress Stain Sprays. There are a few spots of Picket fence DDS too but they aren't that noticeable.
I do LOVE that shattered stamp 
The edges of the background were inked with Black Soot DI n mounted on to white n black card stock before adhering to the white card I had prepared earlier. 
I stamped a sentiment n mounted ready for later .

Now was my 'light bulb' moment so to speak! As the stamped image is like the old film negatives I headed to my photo box n pulled out some old negative, cut them to size n adhered one of them to the left side of the image! 
I created a small black strip with holes in it to mirror the edges of the stamped image n adhered it to a small strip of negative too .

Now it was just a matter of adhering everything onto the background! The final touches were some of my old faves - yep you've guessed it Metal hex nuts! 


N thats what I've been up to today!

Thanks ever so for stopping by n for all the lovely kind comments you leave for me when you do . They are so much appreciated
Hope to see you again soon but  now its time  for me to 'get a riddle on'  n catch the deadline .......... Take care

I would like to enter this card into the following challenges

Saturday 2 May 2015

A Touch of Spring

Hello again , thanks for popping by to see my latest make .
With all the lovely sunshine we had the other week I found myself making a sunny card (well for me anyway) using Paper Artsy JOFY stampsets n stencil , some texture stamps, distress n Archival inks n distress stain sprays.

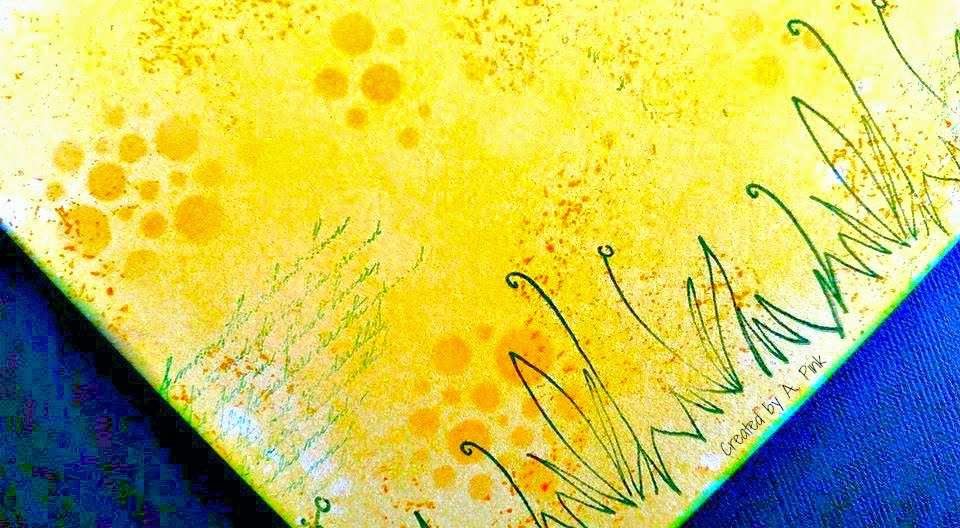
Using Mustard Seed Distress Ink I inked a background panel n spritz with water mainly around the edges of the panel  dabbing the spritzed areas with kitchen roll so as to create much lighter, even white patches . Once dry, I stencilled randomly using Paper Artsy dotty stencil (PA001) n Wild Honey DI , stamped using my old fave script stamp n cornflower blue Archival ink n a criss cross line stamp in dusty concord ,finally spritzing with Distress stain sprays (Wild honey, Mustard Seed n a touch of Rusty Hinge)
I distressed the edges of the background panel using salty ocean DI n a little black soot Di (yes it just HAD to make an appearance lol)
I created a border of grass using Olive Archival ink n a grass line stamp from Jofy stampset (JOFY11)

I created a second border of grass on a spare piece of card n watercoloured this using Crushed Olive n Peeled Paint DI before fussy cutting ready to adhere in place later .
I used Jofy stampset no 10 for the flowers n watercoloured them using distress inks ( salty Ocean , Crushed Olive, Dusty Concord n Broken China. Again the flowers were fussy cut ready for assembling later.

N thats just what happened next - the flowers were manipulated slightly to create some dimension then arranged n adhered in place with dimensional glue .The same with the grass border . 

The final touches were the sentiment using the word stamps on Jofy stampset no 11, an inner circle added to the main flower covered with glossy accents n some highlighter n shadow pen work.


Unfortunately the photos, despite numerous takes n retakes don't portray the true 'brightness' of the card which is a shame because it really does have a 'Cheery Sunshiney' feel to it ! 

I would like to enter this into the following challenges :


Once again I thank you for taking the time to visit n until the next time be sure to have a lovely weekend everyone n keep smiling!