Showing posts with label texture paste. Show all posts

Thursday, 23 May 2019

Create...

Hi There 
Thanks for stopping by today! 

Another week rocks on by in the blink of a eye so its that time again for me to be sharing some creativity over at That's Crafty. 
It's another art panel/ card/ journal page/ book, journal cover that's on offer this week. 
No, that's not one of each just one that could be used for any of those purposes.😁 

Heres a quick peek...


...and if you fancy seeing and reading more you are welcome to join me over at That's Crafty - just click on the link HERE to be whisked right on over . 
Hope to see you soon 
Amanda
x

Wednesday, 17 October 2018

Beware! Mid month inspiration for That's Crafty 'Spookilicious challenge.

Hi Everyone and Welcome 

Hope you are all doing good and are having a great week so far.
I've been busy creating my latest projects for That's Crafty- one I am sharing here today, the other will be over on That's Crafty blog tomorrow.
The current challenge theme at That's Crafty is 'Spookilicious' and as we are half way through the month the Design Team and Guest Designers are today sharing another piece of creativity inspired by the theme. 

Here's my Spookilicious Art panel featuring That's Crafty 'Drippy Skull' stencil 
This began life as a 'test run' trying out the stencil with texture paste, working on a blank sheet of mixed media paper taken straight from the pad. I wasn't sure where I was going with it or indeed if  I was going to use it so I it sat waiting in my W.I.P pile while I wondered........
It was while I was working with alcohol inks that it caught my eye again and so taking the stenciled piece I 'mopped' up the alcohol inks I had on my mat at the time. As I'd used mixed media paper and not yupo the paper absorbed the ink so the colours weren't as intense but they added some necessary colour to get the creativity flowing.
Its a shame I failed to take a photo at this stage as you would be able to see what I mean so much better with a visual.
Using some of the 'mopped up' alcohol ink colour tones as a guide I stengthen their intensity with distress inks applied with a blending tool so the panel had full colour coverage.
I felt the texture paste skull needed to be darker so I repositioned the stencil and heat embossed it with black embossing powder- much better! 
 I added background detail using stamps with Archival ink both around the edges of the panel 
(the branch - Tim Holtz Mr Bones stampset) 
and in and around the skull (text stamp from Tim Holtz Undertaker stampset).
I also added some background stenciling ( Tim Holtz Dot Fade leyering stencil)
some white highlights in the relevant places and of course some painty splatters!
 I'm not a  big fan of high gloss but I do think the skull is rocking the look!
 The four sides and corners of the panel were also heat embossed with black EP and the panel was spritz with Cosmic shimmer spray - the lens hasn't picked up the 'glisten' too well but you can see a few golden speckles if you look ever so closely.
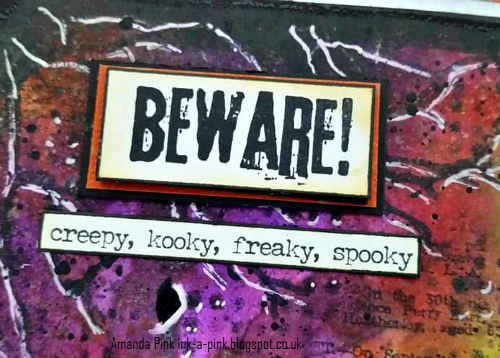
Finally came the words: 'Beware!' (Tim Holtz Mr Bones Stampset) and 'creepy, kooky freaky spooky'
'chills and thrills' (Tim's small talk stickers). Thought they kinda suited!
The panel is mounted on white cardstock, kraftcore shattered collection and finally black mountboard to give it rigidity to display.
I hope I have offered some mid month inspiration with my Spookilicious 'Beware!' Art panel. 
Full challenge details can be found over at That's Crafty along with a gallery of Spooky projects created by the Design Team 

I will be back tomorrow with a sneak peak of the weekly project I mention at the start of this post so hopefully I will see you then and be able to tempt you over to That's Crafty's weekly blog to see the project in full. 
Thank you so much for stopping by today, for your follows and for your kind comments. 
All are very much appreciated. 
Wishing you all a wonderful day 
Take care 
Amanda 
x

Friday, 3 November 2017

Mini Marvels- A Vintage Journey November 2017 Challenge

Hello Everyone and Welcome

Its good to be here again all ready to introduce our new challenge that starts today over at  A Vintage Journey.  Its lovely Anne who is hosting this month with the Challenge theme
'Mini Marvels'
This month's challenge is to create something in miniature - it could be a little book, a tiny scene, a small canvas, a wall hanging or even a box. It MUST be 4" or less in size and be created in your vintage; shabby; mixed media; art journaling; industrial, timeworn or steampunk style.

 I don't often create on a really small scale so initially this theme  seemed like a bit of a challenge for me but after a few false starts and the clock ticking I decided to just go with the flow and follow wherever my creativity would take me .... and in doing so I had a great time using paints, texture, stamps and stencils to create 2 pieces of 'Mini Art' with a bit of grungy feel.

Both pieces are 4 x4 inch square and what I did to one I did to the other, working on them both simultaneously:
The squares were primed with gesso, torn tissue tape was adhered and texture paste was applied through stencils - I used Seth Apters 'Discovery' and 'Explore' stencils

Then acrylic paint in various tones of blue was applied with brayer and fingers adding in black and white acrylic paint, when I felt it needed it, either to knock back any over zealous application or to add a touch of drama.- no rules just building up those layers detail and texture.

At this point I seemed to have neglected to take any more 'step' shots- guess I was enjoying the creativity too much so the rest of the photos are close ups of the 2 finished pieces.

More detail came in the way of stamps - one of Seth Apters Border line stamps (the X's) and one from his faded fragments stamp set (not very noticeable as it was stamped in a pale blue ink). I think a speckle stamp made its way in there too and a couple of others

There's also some scribble pen marks and sketchy paint lines,

some drop shadows and highlights around the letters,

the numbers,

and the dots.

There were a few paint splatters too- I'm sure you spotted them as those of you who know me will know I love the splatters!
The finished panels were mounted onto white and then black card stock and one was embellished with a wire bound crackled mdf heart I had made at some point previously

the other with a crackled butterfly- one of the butterflies from Tim Holz 'Flutter' stamp set stamped onto heavy card stock, fussy cut and altered with crackle paste - just love how grungy it looks!

A Tim Holtz small easel was die cut and adhered to the back of both the pieces

to enable them to stand either alone

as individual pieces

or together as a set.

I hope I have offered some inspiration with my 'Mini Art' project . If you haven't already be sure to pop by A Vintage Journey to view my fellow Creative guides fabulous inspiring 'mini' projects.
We hope you will be able to join in with the challenge but remember 'Miniature' is key! 

At the end of the challenge there will be one lucky winner chosen by Random.Org will will receive our Sponsors prize which this month is a $50 varied selection of chipboard and wood veneer laser cut embellishments generously donated by Southern Ridge Trading
The Creative Guides will also choose 3 Pinworthy Winners who will not only win a Pinworthy badge to display on their blog but will also be invited to join us as a Guest Designer for a future challenge.

I would like to enter these into the following Challenges:
Country View Crafts November Challenge: Stencils.
I would like to enter the heart embellished piece into the following Challenge
The Craft Stamper TIMI Challenge: November- 'Anything Goes' Stamping Challenge'
Creative Artiste Mixed Media Challenge #32- 'Anything Mixed Media Goes'

I hope you have enjoyed your time here today - thank you so much for stopping by.
I really do appreciate every single one of your visits, comments and follows.
Wishing you all a lovely weekend
Take care
and
keep on the happy side
Amanda
xxx

Friday, 29 April 2016

Tag Friday April 2016 at A Vintage Journey

 Hello Everyone and Welcome 
Today over at A Vintage Journey its 'Tag Friday!' I'm sure many of you are already familiar with this tradition but for those of you who aren't let me explain. When there are 5 Fridays in a month, the 5th Friday sees some of the AVJ Creative Guides create and post a tag created in their style. 
So here I am today sharing my 'Tag Friday' tag with you all.

I decided to take this opportunity to have a real good play with my Tim Holtz Distress crayons!

Apart from some Gesso and a little Texture paste the crayons did the rest.
Taking a #8 tag I applied a coat of black Gesso and let dry. I used Gesso, rather than acrylic paint as I wanted that 'dry matt' look and feel that it gives. 
 I then picked up small amounts of white gesso and applied it using a dry flat head paintbrush by just catching the top of the  black gessoed surface to give like a 'scratchy' appearance. 


Out came the crayons to add colour. Again I used them by just catching the surface of the tag, aswell as drawing some 'full' lines of colour randomly and smudging them out with my fingers. I continued like this until I was happy and I had great fun just going with the flow!
I kept the detail simple - texture paste stencilling and stamping -though the stamping isn't that clear to see but I kind of like that.


My focal image is the beautiful cone head flower from Tim Holtz 'Garden Flower' stamp set stamped using black Archival ink  onto watercolour card stock and painted using the distress crayons as a watercolour paint.
That's the versitility of this product -the crayons can give really bold , vibrant intense colour when used 'neat', water them down and they give a much more subtle hue. Using them with a paint brush enables you to 'work inside the lines' too with more precision. 
I distressed the watercolour card stock panel with Distress Crayons smudging it into the panel . I love how the crayons pick up the texture of the cardstock . 


I used a width of lace, a few gem dots, a silver eyelet and an Ideology NO.3 File tab to finish off my tag .


I enjoyed creating with my Distress Crayons and I can see this being the start of a wonderful friendship between us! 

Be sure to stop by A Vintage Journey blog if you haven't done already and see all the other fabulous tags some of my fellow Creative Guides have created . 

I woiuld like to enter my tag into the following challenges: 
Thats Crafty- Go Figure Challenge April 29th 2016.
Thank you for taking the time to pop by today and for all the lovely comments you leave - both are appreciated greatly . 
Enjoy your weekend 
take care 
Amanda 
xxx