Showing posts with label Ideology. Show all posts

Thursday, 16 September 2021

The Grave Digger

 Hi Everyone 

Just another short post here today to give you the heads up that I'm over on That's Crafty's blog in my usual Thursday spot sharing my latest make 'The Grave Digger'. 

It's a mixed media art panel that I guess would be considered to be a 'Halloween' themed piece. Sure, its ideal for that occasion but I know it'll be displayed in my creative space year round along with my 'Skellie Heads' (see here) that I created 5 years ago now. 

I really enjoyed creating this one using some of Tim Holtz fab products - both old and new but all faves! 

Let me introduce you to 'The Grave Digger'


If you'd like to read more about my creativity, see more pics then you are welcome to come join me over on the blog . Just click HERE  for a quick and simple transfer over there. 
Hope to see you soon 
Amanda 
x

Thursday, 31 December 2020

Merry Little Christmas! A Vintage Journey Challenge December 2020 and some Important news....

Hi Everyone and Welcome

Hope you have all had a peaceful Christmas staying safe and keeping well. 

At the beginning of the month A Vintage Journey launched their last challenge of 2020 and some important news but unfortunately I wasn't able to post my contributions at that time so I thought I'd share them with you today, even though the challenge is now closed and today sees the realisation of the 'important news. 
Better late than never, right? 

First for the challenge itself. It was called 'Merry Little Christmas' and the brief was: 

'To celebrate the season and create an ATC or set of ATC's depicting Christmas scenes or colours.'

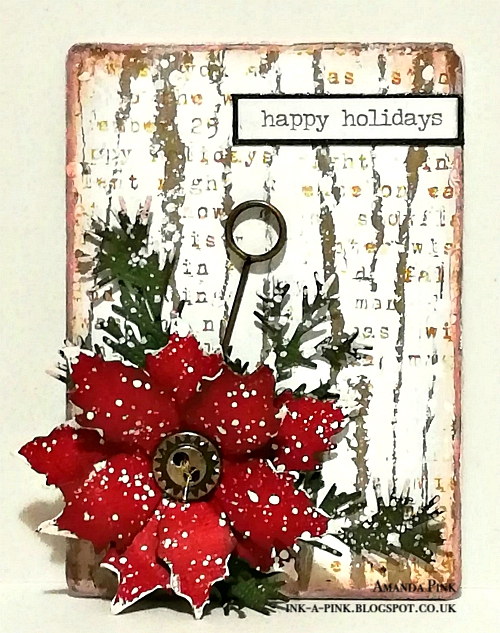
Here's my 'Merry Little Christmas'ATC. It is infact one of two but as both designs are identical I thought I'd post just the one. 


I don't often reach for ATC's to use as a substrate so it was a refreshing change to create with them.  
I crackled the background using PaperArtsy Crackle Glaze and Frescos.....


... added some text stamping using one of Tim Holtz Stampers Anonymous stamps (Holiday words) and some white paint splatters for a snowy effect. 


The gorgeous poinsetta and greenery were cut from kraft core using Tim Holtz Sissix dies (Tattered Poinsettia, Holiday Greens, Holiday Greens Mini). The petals of the poinsettia were sewn together with a brass antique button and the 'snow' continued to fall on the flower and the foliage. 


A Tim Holtz memo pin tucked behind the poinsettia embellished and added to the focal arrangement....


.....while a Tim Holtz metallic sticker provided the ideal seasonal sentiment to suit all: 
'Happy Holidays'. 


I hope you're holidays have been happy and if they aren't yet over I hope they continue to be. 

*********

 Now, for my second ATC . This was created especially for AVJ as the important news shared on the challenge launch post was that A Vintage Journey would be pulling into its final destination and terminating its journey today, New Years Eve 31st Dec 2020. 

AVJ began its journey on the 28th Feb 2014 and has been travelling along ever since. It fast became a popular challenge blog picking up many followers, subscribers, visitors and regular challenge entrants along the way. 
I was thrilled to join the team in Nov 2015, beyond happy and so honoured and humbled to be creating alongside so many talented creatives. It really was a dream come true.
AVJ has been a huge part of my creative journey so far and I'm going to miss it heaps- already am! 

Heres the ATC I created for AVJ and a few supporting words..

' I have loved every minute journeying with my fellow Creative Guides that have become valued friends who I love, respect and admire greatly. You all have a very special place in my heart. 
 A Vintage Journey has allowed me to grow both creativity and personally and I feel truly blessed and so very grateful to have been an AVJ Creative Guide for 5 years.
Since knowing A Vintage Journey was reaching its final destination my heart has been heavy but it has also been full, full of all the many ‘happy’s’ I now have to treasure. 
Thank you AVJ it really has been the best journey ever, an amazing ride that I will remember and appreciate always.' 💛 


I covered the ATC background with words that to me epitomise AVJ....


I realised I'd missed out 'warmth' so I portrayed the warmth I've felt being part of the AVJ family through the colours. (Distress inks)


I had to feature our acronym 'AVJ' some where on my ATC ....


......and there had to be a heart. It may be rusty but its packed full of happy memories and love for AVJ  and all my Creative Guide friends. 
💛

A Vintage Journeys final post went live on the blog today so if you wish to pop by you are welcome. 

**********
That just leaves me to thank you all for supporting me with your visits, follows and comments during my AVJ years. I have appreciated greatly and only hope that along the way you have enjoyed stopping by and that I have offered some creative inspiration.

My personal creativity and blog will continue so I hope you will stay around to see what comes next????  

As this crazy year draws to a close tonight I would like to wish you a peaceful, healthy, safe New Year. 
May it be kind to one and all. 

Take Care 
Hugs
Amanda
x

Friday, 5 July 2019

'Precious Metal'- A Vintage Journey Challenge, July 2019

Hello Everyone and Welcome

Today we launch our latest challenge at A Vintage Journey and I will be the host this time with the challenge theme

Precious Metal
'For this challenge we would like to see some kind of 'precious metal' feature in your project. Think gold, silver, brass, copper aluminium, steel..... It could be in the form of embellishments, cardstock, gilding wax, foil, gold leaf, or rub- ons. Just remember to ensure you create in one of our preferred styles of vintage, shabby, mixed media, art journaling, industrial, timeworn or steampunk.' 

I have created a 'Precious Metal' Mixed Media canvas for this challenge entitled
'Simplify Life'
-kind of a visual creative 'note to self!'


As I will be sharing details of how I created my canvas on the Friday 19th July over at AVJ, I have just a brief account and a few photos to share with you today.
I featured a few different forms of 'precious metal' in my canvas:


Gold and silver metallic paint 


to create layers of fabulous texture and detail. 


Some metal ideology pieces: a philosophy tag and a piece of Vignette hardware,


a game spinner, metal ruler, typed token and a couple of long fasteners which embellish, enhance and provide the canvas's title.


There are also some touches of silver gilding wax


to accent some of the elements


and a 'weather rusted' metal piece of hardware that stars as the focal feature!
I think it may be a sink plug fitting of sorts? I found it on the street when I was clocking up some steps earlier this year, what I call my 'street swag/ boardwalk booty' and I think its just the perfect fit for my precious metal 'Simplify Life' canvas.


I hope I have offered some creative inspiration for our challenge. If you haven't already be sure to pop by A Vintage Journey where there is a fabulous collection of inspiring 'Precious Metal' projects created by some of our Creative Guides and be sure to pop by AVJ on the 19th for my Tutorial post. 
We hope you will join us in this challenge as we are really looking forward to seeing your creativity. 
As always there will be 3 Pinworthy winners chosen at the end of the challenge with each winner being awarded a Pinworthy winners badge to display on their blog and their project will be pinned to our Pinworthy Winners Pinterest board.

Thank you so much for taking the time to stop by today. 
Your visits, follows and comments are sincerely appreciated- very much so!
Wishing you all a lovely weekend
Hope its a creative one
Take care 
and 
'keep on the happy side'
Amanda
x

Friday, 7 April 2017

The Magic of Three- A Vintage Journey April 2017 Challenge

Hi Everyone and Welcome

Hope you have all had a great start to this month- April already and time to kick start our New Challenge Over at A Vintage Journey . This month Annie is our host and her challenge is
'The Magic of 3'
Here's what Annie says: 'It is said that using 3 of something adds interest and power whether its a conversation , art or numbers . Let us see how you use three of something in your challenge project- numbers, techniques, stamps, colours, words, products the list is endless. Let us know your magic three components and ensure your project is in our vintage, shabby, mixed media. art journalling, industrial , timeworn or steampunk styles we favour '.

For my 'Magic of 3' project I have made an art panel working with a few variables of 3. If you're ready to find out what they are lets make a start
To create the art panel itself, excluding all the elements and embellishments I used 3 substrates: Mountboard - that's the main panel and cardstock and canvas- they're the smaller central panel.
I have also worked with three colours - Black Soot, Picket Fence and Twisted Citron distress paints/distress crayons.
The central panel is cardstock covered with canvas with Ranger texture paste applied through Tim Holtz 'Stripes' layering stencil down the centre and in both the top left and bottom right corners.
I used Black Soot distress crayon to colour the canvas applying it lightly to the canvas and blending with a dampened finger to create lighter tones. The stencil lines are emphasised using Black Soot distress paint.
I love how the crayons pick up the grain of canvas- instant detail! Have you noticed how many stencil lines are in each of the corners .....
Some subtle stamping using Jet Black Archival ink and some splatters (of course) using Picket Fence and Twisted Citron distress paint added a touch more detail.
This panel was then adhered to a panel of Mountboard with a tissue tape border.
how fortunate 3 forms part f the numbers on the tissue tape .
Now for the focal feature.
Again I have used three substrates - metal wire, cardstock, wood. The wooden heart is stencilled using texture paste through Tim Holtz dot fade stencil and painted with Black Soot distress paint. The dots are highlighted with a paint mix of black and white paint.
The butterfly is one of the beauties from Tim Holtz new release stamp set 'Flutter' simply stamped on cardstock and painted using Twisted Citron distress paint.
All the embellishments come in threes too - the butterfly is embellished with an ideology game spinner attached with a brad topped with a gem dot

and 3 hex nuts topped with 3 gem dots embellish the top and bottom edges of the canvas.
So that's at least 6 variables of 3 used in creating my 'Magic of 3' art panel.
and I have to say I am pleased with it - hope you like it too.
I hope my art panel along with all the fabulous projects created by my fellow Creative Guides, which can be seen here at A Vintage Journey ,will inspire you to go create yourself and join in our 'Magic of 3' challenge
At the end of this challenge there will be one lucky winner chosen by Random Org who will receive our Sponsors prize which this month is a $50 gift card kindly donated by Emerald Creek Craft Supplies.
The Creative Guides will also choose 3 Pinworthy winners who will not only win a Pinworthy badge to display on their blog but will also be invited to join us as a Guest Designer for a future challenge . We look forward to seeing your creativity and appreciate all your entries and participation.

I would like to enter this into the following challenges 
The Craft Stamper TIMI Challenge: April - 'Take a Stamp'. 
Creative Artiste Challenge Blog- Challenge #25 
Altered Eclectics: Anything Goes as long as its altered/ MIxed Media, NO Cards / ATC's 
 
Thank you for stopping by today. 
As always your visits, comments and follows are welcomed, truly valued and mean alot.
Wishing you all a wonderful weekend
Take care and until I see you again
keep on the happy side
Amanda
xxx

Friday, 3 March 2017

All Aboard- A Vintage Journey March 2017 Challenge

Hi Everyone and Welcome

Hope you've all doing good and have had a great week.
Today we launch our new Challenge over at A Vintage Journey. Lovely Brenda is our host this month and her chosen challenge is
ALL ABOARD-HAPPY BIRTHDAY AVJ !
and here's what Brenda has to say
'Come join in our All Aboard Challenge where you can choose what you want to step on board with and although we still need to see you working with the styles and genres listed in the banner at the top of the page you can choose whether you share a card, some altered art, a journal page, a painting. infact whatever you fancy but with no theme to follow . Lets have some fun , share our current creations and enjoy the informal feel of our birthday celebrations.'

To celebrate our birthday and the passing of time since A Vintage Journey began 3 years ago I have created a fully functional faux metal clock.
The body of the clock is created using Eileen Hull Box Square (ATB) die with mountboard. Once die cut, all pieces were primed with gesso and painted with Tim Holtz Distress paint.
The Mirror board panels were cut to fit each of the sides (including top and bottom) of the ATB. The panels were then altered using one of Tim Holtz new release Texture fade - Numeric and Tim's painted industrial technique. 3 of the panels were placed in one area of the embossing folder, 3 in a different area to achieve a variation in pattern .
A close up of the emboss -Just love the result!
The embossed panels were adhered to the ATB pieces and before assembling the ATB a hole was punched out of the centre of what would be the face of the clock. This would allow for the clock mechanism to be fitted securely.
The 'lid' of the ATB was left so it would open and close to allow for easy access to fit and replace the battery when needed. The internal area could also be used to store spare batteries or any other 'bits' you may want to keep safe.
The clock face was created using Tim Holtz Gadget Gears Bigz die, greyboard, mirror board , distress paint and Texture fade emboss folder - Numeric .
Chunky Inconal hex nuts were used for feet
and one of Tim Holtz Ideology Faucet knobs was adhered to a Iconal hex nut to create a knob/ handle
which would enable the 'lid' of the clock to be opened and closed with greater ease.
(see the video- but please excuse the lack of video professionalism - I'm still in training!!)
Then it was just a case of cutting the hands down to size, fitting them in place and of course making sure the clock works......
Is there a low pitched tick tock? Does the second hand move?
Yay! There is and it does .
(apologies again for the lack of video professionalism)
I really enjoyed making this clock
and I hope I have some inspiration for you to go and have fun with your creativity and join us in our birthday challenge. We always love seeing what you create and appreciate your entries.
At the end of the challenge there will be one lucky winner chosen by Random Org who will receive our Sponsors prize which this month is a £20 voucher to spend at Country View Crafts.
The Creative Guides will also choose 3 Pinworthy winners who will not only win a Pinworthy badge to display on their blog but will also be invited to join us as a Guest Designer for a future challenge
If you haven't already be sure to pop by A Vintage Journey to view some of my fellow Creative Guides projects . There really are some fabulous -not to be missed -creations to be seen! 

Thank you so much for stopping by today .
Your visits, comments and follows are very much appreciated .
Wishing you all a lovely weekend
Take care
Amanda
xxx

'Know the true value of time; snatch, seize, and enjoy every moment of it. No idleness, no laziness, no procrastination: never put off till tomorrow what you can do today- TIME is Precious!'


Friday, 16 December 2016

Meet the Dapper Deer!

Hello Everyone and Welcome
Not long now  - just 9 sleeps to go to ......! Are all you ready?
 I thought I was and then realised I'd overestimated the time I had left and am now running around frantically trying to catch up as the clock ticks forever nearer to the big day.
Today though I'm  taking time out to share with you one of the Christmas cards I have made using some of Tim Holtz fabulous products- stamps, dies, embossing folders, distress inks and paints, industrous stickers, metallic card stock, watercolour card stock and ideology .
 Let me introduce to the The Dapper Deer all dressed to impress!  

The background is heat embossed onto black card stock using Tim Holtz Holiday words stamp and clear embossing powder
Tim Holtz BIgz dapper die dressed the deer. 
(Run the die through the Big shot to just above the lapels so as not to die cut the moustache or top hat)
Embossed silver mirrorboard using an embossing folder from Tim Holtz knit set and Tim Holtz painted industrial technique created a panel to use for the dickie bow, lapels, collar tips and buttons 

The deer head (Tim Holtz Scribble woodland stamp set ) is stamped in Black archival onto watercolour card stock ( smooth side) ,and subtly painted using hickory smoke distress paint as a watercolour.  The antlers are heat embossed using silver embossing folder
and  given a touch of  black soot distress paint. 
Industrious stickers( borders and frames) embellished the edges of the background, once matted and layered using Tim Holtz silver metallic card stock and white card stock
 
 With a few pieces of Christmas related ideology,  hex nuts topped with festive red gems for buttons and some splatters of snow (Picket fence  distress paint)  and Dapper Deer is ready to celebrate Christmas in style!  
Thank you so much for taking  the time to stop by . I hope you have enjoyed your visit.
I'll be back at some point in the coming weeks to share a few more of the Christmas cards I have made this year so look forward to seeing you again soon . 
Until then have fun, be good and keep believing!!!
hugs
Amanda
xxx🎅xxx