Showing posts with label Tim Holtz Grit paste. Show all posts

Thursday, 6 September 2018

Be ..

Hi Everyone 

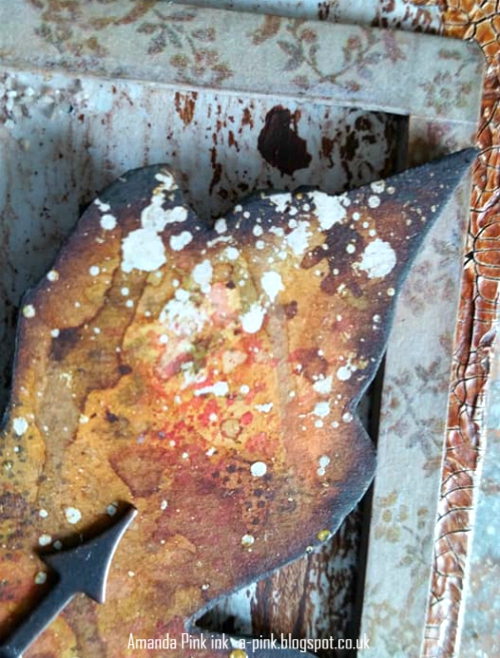
I'm back again today with a little sneak peak of a project I have made for my first weekly post as a Guest Designer over on That's Crafty blog. I would love for you join me over there where I am sharing the project in full and details of how I created it . Of course I had to use some of my much loved products - I wonder if you can guess what they may be? 

A little hint by way of that sneaky peak I mentioned may help .......
If you fancy joining me just click here and you will be transported over . 

Hope to see you soon ..... 
Amanda 
x

Wednesday, 5 September 2018

Forever Autumn - Guest Designer at That's Crafty


Hi Everyone and Welcome

I have some happy news to share with you today as well as a little creativity.

First the news : I have happily accepted a very kind invite to be a Guest Designer for That's Crafty! It was such a surprise to be asked and I am honoured to have been given this wonderful opportunity. Thanks so much Laura 😊

Now for the Creativity.... Today sees the start of a new challenge at That's Crafty and the theme this time is 
'Forever Autumn'-
 We would like for your creations to have an Autumnal feel to them.

I love the rich, warming colours of Autumn and the rustle of fallen leaves underfoot both of which provided inspiration for my 'Forever Autumn' tag

I don't have many process shots but I will take you on a tour around the tag.
The large tag which I did remember to photograph before I added all the extras is a That's Crafty MDF Tag. This one is a #10 but there are a range of sizes available that can be found here. They really are excellent quality, take mediums very well and are great value for money. I have used one of these tags in a previous project which can be seen here. 
The background was created using distress inks (Fossilised Amber, Rusty Hinge, Wild Honey , Mustard Seed...), Distress Resist spray, Wrinkle Free Distress technique, Iced Spruce distress paint and a brayer.
I love the effect of the Distress Resist spray and the brayer paint over the inks gives a kind of misty feel like we often get during Autumn .
There's some script stamping too - I used Tim Holtz Ledger Script with Coffee Archival ink. 
The small tag is a #8 Tim Holtz tag cut from mountboard, crackled with Deco Art crackle paint and coloured with a combination of Tim Holtz Distress paints ( Rusty Hinge, Fossilised Amber ) and DecoArt media fluids ( Burnt Sienna, Raw Umber, Burnt Umber, Transparent Yellow Oxide, Quinacridone Gold)
The Leaf is a That's Crafty greyboard leaf covered with a Distress Resist sprayed Wrinkle Free background. The same distress inks were used as for the large tag background with the addition of a couple more (Forest Moss, Gathered Twigs, Fired Brick). The leaf is embellished with a piece of Tim Holtz Ideology. The frame is a That's Crafty MDF Atc frame covered with Tim Holtz designer tape . The back panel that is purposely offset slightly from the frame is a piece of 'brayering off' palette paper 
and to the top left corner of this there's a sprinkling of mineral powder
Here's a close up of those fabulous speckles of white created by the Distress Resist spray ....
The broken twigs are from the gatherings of  recent 'wood walks'. They are bound with coarse fibres and add a 'natural' element to the tag. One sits at the top of the small tag
and the other, the larger one, sits above the sentiment
The large base tag is decorated with an old rusty can pull - again a 'find' when I've been 'stepping' out this summer. I always set out 'hands free' and almost always come home 'hands full'!  I can't resist a bit of 'Street Swag/ Boardwalk Booty' as I call it!  Sure you'll be seeing some feature in my future artwork.
The tag has great dimension with all the layers and chunky materials used
and I hope it makes you think of the Autumn/Fall season.
Full details of the challenge can be found over at That's Crafty challenge blog along with a gallery of inspirational projects made by the talented ladies on their design team.

I would like to enter my 'Forever Autumn' tag into the following challenges:
Stamps and Stencils- 'Its been a while'
Creative Artiste #42 Challenge : 'Anything Mixed Media Goes'

I'll be back tomorrow with a sneak peak of a project I have made for my GD weekly post so hopefully I will see you then and be able to tempt you over to That's Crafty's blog to see my project in full. 

Thanks for stopping by today. I really do appreciate you taking the time to visit, follow and comment.  

Hope you all have a lovely day 
Take care 
Amanda
x

Friday, 1 December 2017

Winter Wonderland- A Vintage Journey December 2017

Hi Everyone and Welcome

Happy December to you all! According to the calendar The Christmas countdown and Winter season both start today and so does our new Challenge over at A Vintage Journey. Lovely Sandy will be your host this time with the challenge "Winter Wonderland'. 
Here's what Sandy says :

'For the month of December let's think of the season as well as the holiday with Winter Wonderland. As the song goes, sleigh bells ring, snow is glistening! Let's see some snow, snowmen, bare trees would be nice or some snow covered pines in the meadow. Whatever Winter Wonderland means to you in your vintage, shabby, mixed media; art journalling; industrial or steampunk style'.

I bought a Kaisercraft advent calender a fair few years ago now and had all good intentions to make it ready for the following Christmas but yes, you guessed it - that never happpened! So I saw Sandy's challenge as an ideal opportunity to finally unearth it from the undergrowth (my stash) and rectify my unfinished business of yesteryear. I constructed and altered the calender with paints, mediums and papers and created a Snowy Winter wonderland scene in the central window box . 
I got so caught up in the creative process that I didn't get any process shots but hopefully the photos I do have, will, with a little narration speak for themselves .

Kaisercraft make a few different styles of this sort of advent calender. I had trouble sourcing any on their website but I did find this link that shows you a few of the different styles available on the market. They all come flat packed so you have to 'self construct'- that is assemble the calender structure itself and each one of the 24 boxes. Believe me there were times when I thought I was going to 'self destruct' during this process when things weren't going as smoothly as I planned and I knew I had a deadline to meet but I carried on regardless in the hope that it would come together in the end - I think it did! 

The main Calender structure 
This was primed with gesso and painted on all sides (inside and out) with white acrylic paint. The outside walls of the structure were then painted with silver acrylic paint 
and crackled with White Deco Art crackle paint . Once the cracks start to form they reveal the colour of the paint beneath - in this case silver. 
The boxes
These were each adhered together before being primed and painted with white acrylic paint. I then selected 3 different papers that I thought would compliment the colours and tones in the focal paper - the 'winter forest 'that would set the scene for my Winter Wonderland. Only one of the papers is from a Christmas collection pad- the type print from Tim Holtz Christmas paper pad ,2017 release , the other two are from 'Engraver' paper pad by Prima Marketing. 
I cut them to size (8 of each paper) and adhered them to the front of each box, trimming around each of the box front indents by hand.
The Winter Wonderland 
I came across this fabulous 12x12 scrapbook paper of a wintry forest by Kaisercraft and knew it would be be perfect for my project.
I measured, cut and adhered the main panel in place and then because I'd cut from the middle of the 12x12 I was able to use the remaining edges of the paper for the sides and top of the window box ensuring I lined them up well to achieve a continual flow of the forest.
The base of the window box is covered with Tim Holtz Grit Paste and DecoArt Snowtex, sprinkled while wet with a little Distress Stickles glitter- just to achieve the odd twinkle and glisten here and there. 
The 2 gates are mdf, primed with gesso, painted with Tim Holtz Ground Espresso distress paint, DecoArt Paynes grey media fluid paint
and finished off with a touch of snow!L
Looks like someone's managed to snag a selfie ...
Meet Buster and his best pal Jake who have enjoyed a fun filled day cross-country skiing in the Winter Wonderland - ok Jake skied, Buster ran! 
Either way it was one of those 'Remember the Now' kinda days
Snow buddies forever!
My 'Winter Wonderland' project!
I'm not sure at present whether I will use this as an Advent Calender or as a storage unit, so have held back on adding numbers to the drawers until I have decided?? I'll keep you posted :) .

I hope I have offered some creative inspiration and that you will look to joining in Sandy's challenge. Be sure to stop by A Vintage Journey to see the gallery of wonderfully inspiring 'Winter Wonderland' projects created by some of our very talented Creative Guides.

As always at the end of the challenge there will be one lucky winner chosen by Random. Org who will receive our Sponsors Prize who this time is 

The Creative Guides will also choose 3 Pinworthy Winners who will not only win a Pinworthy badge to display on their blog but will also be invited to join us as a Guest Designer for a future challenge.

I would like to enter this project into the following Challenges:
(Create a Mixed Media holiday project with your interpretation of our inspirational photo) 
The 'colour tones' and the 'glisten' in the photo were my inspiration

Thank you so much for stopping by today, for your follows and for always being so kind and generous with your comments. It always makes my heart happy to know my creativity is appreciated. 
Hope you all have a wonderful weekend
Take care
and 
keep on the happy side
Amanda
xxx

Friday, 2 June 2017

Canvas- A Vintage Journey June 2017 Challenge

Hi Everyone

Hope you are all doing good and have had a great week - the last one in May - this year sure is passing by quickly!  So, as we head into June we have a new Challenge starting today over at A Vintage Journey. It's our lovely Nikki hosting this month and she has chosen the Challenge theme
'Canvas'
"Let's work with canvas this month in our vintage; shabby; mixed media, art journalling, industrial, timeworn or steampunk style. It doesn't matter how as long as some canvas is a dominant feature of your project. Perhaps you may use a canvas in the traditional way or use the reverse to create a shadow box? Canvas boards are fabulous to work on or perhaps you have some canvas sheets which can be cut and adhered to another surface."
Despite having a large collection of canvases in a whole range of sizes amidst my art stash (I'm Amanda and I'm a canvas collector haha) I decided not to disturb the "pack" so to speak and instead used canvas sheet on my 'Broken Maze, Hidden Gem' project.
It was Seth Apters a'MAZE'ing die that provided the inspiration for this project and one that no doubt you will see again in my work as I already have a couple prepped in various guises all 'good to go'.

 I'll start from the base up with the detail, sharing some close ups, mainly of the finished project as I got so involved in the creativity that I forgot to 'point the lens' during the process.
The base
  A 15x15 cm wooden box frame I found in my large stash of alterables (yes,I collect them too haha) primed with gesso and painted with black acrylic paint. For this project I worked on the back of the box frame.The sides are decorated with designer tape by Tim Holtz (Chatter)


and the top, a piece of textured wallpaper cut to size, lightly coloured using Distress inks (Iced Spruce, Tumbled glass, Faded Jeans) with some paint splatters too.

The larger Circle panel . 

 An MDF circular panel covered with Canvas sheet, primed with gesso and then painted with Distress paints (Iced spruce, Bundled Sage, Broken China, Mermaid Lagoon, Black Soot) and a few Deco Art media fluid acrylics (Prussian Blue, Paynes Gray) using brushes and brayers. As per my usual - no set rules just layering up the paint, going with the flow and enjoying the process.

Love how the paint picks up the texture of the canvas, creating instant detail which I added to using stamps (Seth Apter's Dot Matrix, Tattered Screen) as well as textured paper.

The smaller Circle
An old CD (and dare I say it - I seem to have alot of these lying around too) altered with acrylic paint and gesso. Love the subtle detail picked up from the pattern on the paper towel I used to remove some of my over zealous application of gesso .

Further detail again came in the way of stamps (Seth Apters Word Chain, Dot Matrix) with Shadow grey and Jet black Archival ink .

The Broken Maze
created from Seth Apters Broken Maze die. This was die cut about 4 times from greyboard and then layered and adhered one on top of the other to give some dimension and rigidity but only enough to still be able to manipulate the Broken Maze into a dome shape once altered.

The Maze was altered using Tim Holtz Grit paste and then painted (Prussian Blue Media Fluid and
Distress paints as already mentioned) using a dry brush with silver gilding wax used to help enhance the texture of the painted grit paste.
 
I die cut and adhered together a second batch of the Broken Maze using black card stock to act as a drop shadow when assembled. .

I adhered an Ideology faucet knob to the centre of the maze

topped with a black gem bead

underneath which lies a hidden gem (a glass bead altered with alcohol inks)

that
can be seen glistening in the light

  but only found

once you have worked your way through the Broken Maze

I hope my Broken Maze Hidden Gem creation has offered some inspiration to at least some of you stopping by today and that you will join us in our Canvas challenge.
As always at the end of the challenge there will be one lucky winner chosen by Random Org who will receive our Sponsors prize which this month is a $25 gift card kindly donated by Shimmerz Paints
The Creative Guides will also choose 3 Pinworthy winners who will not only win a Pinworthy badge to display on their blog but will also be invited to join us as a Guest Designer for a future challenge .
Don't forget to stop by A Vintage Journey to see the gallery of fabulous canvas projects created by my very talented fellow Creative Guides.
Before I sign out for today I would like to say  "big thanks to Seth Apter for designing so many fabulous products, (yes, I am very happily collecting Seth products now too) for inspiring my creativity with not only your products but with your blog The Altered Page and your own creativity and amazing art! 

Many thanks to all of you too for stopping by today .
Your visits, comments and follows are very much appreciated .
Wishing you all a lovely weekend
Take care and  keep on the happy side
Amanda 

Friday, 2 December 2016

Winter Magic- A Vintage Journey, December 2016 Challenge

HI Everyone and Welcome
Hope you've all doing good and have had a great week. With Winter now upon us I hope you will be able to join us in our new Challenge over at A Vintage Journey which is just perfect for the season. Debs is our host this time and she has chosen
Winter Magic
'For us in the Northern Hemisphere December brings the start of Winter is so much more than that and so we ask , how would you interpret the magic of Winter? Snow, Icicles, colours of blue, silver and white, the festivities of Christmas, misty winter landscapes: show us what your magical focus is for this season .As always we ask that you follow our travelling instructions and that your project be created in a vintage, shabby, mixed media, art journaling,industrial or steampunk style .'
As always there will be one lucky winner who will receive our sponsors prize which this month is a £20 voucher to spend at Country View Crafts.
The Creative Guides will also choose 3 pinworthy winners who will not only win a pinworthy badge to display on their blog but will also be invited to join us as a Guest Designer for a future Challenge.

Snow always comes to mind when I think of 'Winter Magic' so I have a canvas to share with a snowy feel created with an arty, wintry spirit.
Having come across a 5x7 canvas I started painting earlier this year I decided to build on the grey wash I'd already laid down way back when by adding tones of blue, grey and white using Tim holtz distress paints ( broken china, tumbled glass, hickory smoke, picket fence) and gesso for the white. All applied very freestyle and with the finger , just going with the flow
continuing the process until it looked ok. I love how the paint and especially the gesso pick up the texture of the canvas.
Unfortunately that's the only process photo I have so I hope you will now enjoy a descriptive tour around the canvas
Detail was created using stamps (Tim Holtz snowflakes, Birch , Half tone, a script stamp) with Archival ink(cornflower, watering can,cobalt) and Tm Holtz layering stencils (Snowflakes,Dot fade) with Tim Holtz Grit paste and gesso .
The snow is a mix of both DecoArt Snowtex and Tim Holtz Grit paste . It was given a touch of sparkle using Tim Holtz distress glitter (rock candy) and in some lights it really does gently glisten. A spritz of perfect pearls also added a touch of shimmer.
With the crackle sneaking in on the photos so far its time for the focal feature . This was created using Seth Apters Drip drop die - multiple die cuts adhered together , painted in silver and crackled using DecoArt crackle paste,the cracks being highlighted with gilding wax .
This was adhered to a painted and lightly sparkled mdf pocket watch which provides an ideal base for the snow dusted Tim Holtz dimensional Silver star.
And a few snowed up embellishments helped finish off my arty spirited canvas
with a snowy feel

I hope I have offered some inspiration and that you will be able to join us in our 'Winter Magic' . If you haven't already be sure to pop by A Vintage Journey to view some of my fellow Creative Guides projects. There are some fabulous creations to be seen and lots of inspiration to be had. 
I really did enjoy being back in my 'happy' place doing what I love, for a design team that I feel so lucky and proud to be apart of.

I would like to enter this into the following challenges : 
The Craft Stamper TIMI December Challenge: Take a Theme: Snow and Ice  
Frilly and Funkie : Home for the Holidays 

 Thank you so much for taking the time to stop by today and big thanks too for always leaving me such lovely comments. 
Both are so very much appreciated.
Have a lovely weekend Everyone
Take care and keep on the happy side
Amanda
xxx