Showing posts with label distress paints. Show all posts

Thursday, 4 July 2019

Lucky No.247

Hi Everyone 
Thanks you for stopping by today 😊. 
I would like to begin today by wishing all my American friends, family and followers a very 'Happy 4th of July'- such a significant day in your country's history and indeed the worlds too!
'God bless you all and God Bless America!'

So today, it being Thursday and all you can find me over at That's Crafty sharing my latest DT project which this week is a piece of Tag Art that has a kinda grungy retro feel. Given the colours and the stars and stripes incorporated in the design you could be forgiven for thinking I created it with  the 4th of July in mind . If I did it was all down to my creative subconscious and if that's what happened then I am more than happy! 
Heres a quick glance of the tag 


If you fancy seeing and reading more then please feel free to join  me over on That's Crafty's blog. 
For the quickest route just click HERE.
Hope to see you soon
Amanda
x 

Thursday, 27 September 2018

Dreamer...

HI Everyone 

Hope you are all doing good and you are having a great week 😊.  
As today is Thursday I'm over on That's Crafty's Blog sharing my weekly Guest designer project.  
Here's a sneak peak of my creativity this time using one of StencilGirl products© stencils ' 'Angel Circle designed by Kate Thompson. 


 'Dreamer' (as I have called her) and I would love for you to join us over there.
 You're just one click (here) away 

Hopefully we'll see you soon ..... 
Amanda
x

Wednesday, 19 September 2018

Be Thankful' -mid month inspiration for That's Crafty 'Forever Autumn' Challenge

Hi Everyone and Welcome 

Hope you are all doing good and having a great week so far. Over at That's Crafty the challenge theme this month is 'Forever Autumn'. As we are half way through the challenge the Design Team and Guest Designers get to share another piece of creativity inspired by the theme. 

Here's my autumnal 'Be thankful' Plaque 

I love working on the round or using circles within my work so for this piece I used That's Crafty MDF rounds . They are fabulous surfaces to work on great quality and are available in a variety of sizes . As you can see I used 2 of the sizes. 
I don't have any process shots to share (sorry) so I will take you on a narrated tour around the plaque. 

Lets start with the larger round. This was primed with gesso and crackled with Deco Art crackle paste. Once the paste was thoroughly dry and cracks had formed colour was added using a selection of DecoArt Media Fluids and a couple of Tim Holtz distress paints continuing the process of adding paint, working it into the cracks, wiping it back until happy. This was almost there ....
The smaller round is covered with an actual autumnal leaf from my garden that I had gathered late Sept/ Oct time last year and pressed. With its own natural beauty and richness in colour it needed little else other than a touch of subtle stamping and a very light touch of gilding wax to accentuate its veins . Oh and maybe a few splatters - you will notice they run throughout the design! 
Brown string /jute was wrapped around the leaf covered round 
The focal leaf (kinda looks like a tree too don't you think?) is a That's Crafty Greyboard leaf shape altered in the same way as the leaf that features on my first 'Forever Autumn' project which you can see here. 
It's embellished with Tim Holtz clock hands to symbolise turning back the clocks and the changing of the season. The leaf/ tree sits on a small piece of pine cone branch 
The finishing touch come in the way of 'words and numbers' and Tim Holtz clipping stickers provided these...
 'Be thankful'
and the 'no 24'
Be thankful for each and every 24! 
I hope I have offered some mid challenge inspiration with my autumnal 'Be thankful' Round. Full Challenge details can be found over at That's Crafty along with a gallery of fabulous projects created by the talented Design Team.

I would like to enter my 'Be Thankful' plaque into the following challenges
Stamps And Stencils: 'Its been a While' 
Creative Artiste #42 Challenge: 'Anything Mixed Media Goes 

I'm back tomorrow with a sneak peak of my weekly project so hopefully I will see you then and be able to tempt you over to That's Crafty 's blog to see the project in full. 

Thank you so much for stopping by today . I really do appreciate you taking the time to visit , follow and comment . 
Have a lovely day Everyone 
Take Care 
Amanda 
x

Thursday, 13 September 2018

Break the Rules......

Hi Everyone

Today I would like to invite you to join me over at That's Crafty where I am sharing my latest weekly project as a Guest Designer. This time the grungy girl in me has taken a break and I have gone all out colour!! Sometimes an explosion of colour is just necessary, don't ya think? 😊

Here's a sneak peak of my colour funky 'Break the Rules' art panel...


To see it in full and read all about it just click here and you will be whisked right on over
Sunshades are optional 😄
Look forward to seeing you there soon 
Amanda 
x

Wednesday, 5 September 2018

Forever Autumn - Guest Designer at That's Crafty


Hi Everyone and Welcome

I have some happy news to share with you today as well as a little creativity.

First the news : I have happily accepted a very kind invite to be a Guest Designer for That's Crafty! It was such a surprise to be asked and I am honoured to have been given this wonderful opportunity. Thanks so much Laura 😊

Now for the Creativity.... Today sees the start of a new challenge at That's Crafty and the theme this time is 
'Forever Autumn'-
 We would like for your creations to have an Autumnal feel to them.

I love the rich, warming colours of Autumn and the rustle of fallen leaves underfoot both of which provided inspiration for my 'Forever Autumn' tag

I don't have many process shots but I will take you on a tour around the tag.
The large tag which I did remember to photograph before I added all the extras is a That's Crafty MDF Tag. This one is a #10 but there are a range of sizes available that can be found here. They really are excellent quality, take mediums very well and are great value for money. I have used one of these tags in a previous project which can be seen here. 
The background was created using distress inks (Fossilised Amber, Rusty Hinge, Wild Honey , Mustard Seed...), Distress Resist spray, Wrinkle Free Distress technique, Iced Spruce distress paint and a brayer.
I love the effect of the Distress Resist spray and the brayer paint over the inks gives a kind of misty feel like we often get during Autumn .
There's some script stamping too - I used Tim Holtz Ledger Script with Coffee Archival ink. 
The small tag is a #8 Tim Holtz tag cut from mountboard, crackled with Deco Art crackle paint and coloured with a combination of Tim Holtz Distress paints ( Rusty Hinge, Fossilised Amber ) and DecoArt media fluids ( Burnt Sienna, Raw Umber, Burnt Umber, Transparent Yellow Oxide, Quinacridone Gold)
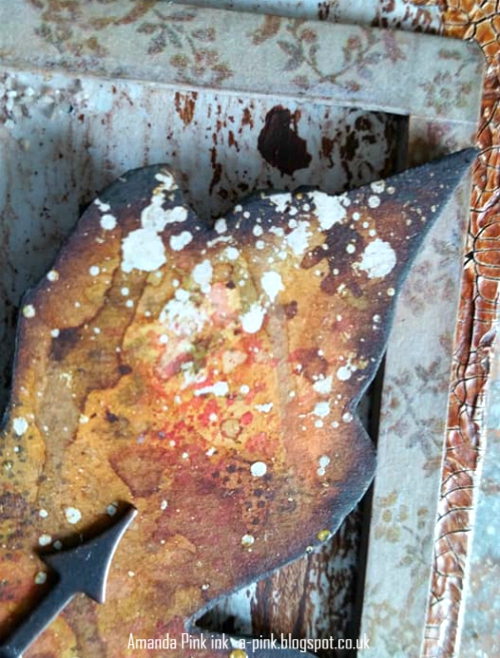
The Leaf is a That's Crafty greyboard leaf covered with a Distress Resist sprayed Wrinkle Free background. The same distress inks were used as for the large tag background with the addition of a couple more (Forest Moss, Gathered Twigs, Fired Brick). The leaf is embellished with a piece of Tim Holtz Ideology. The frame is a That's Crafty MDF Atc frame covered with Tim Holtz designer tape . The back panel that is purposely offset slightly from the frame is a piece of 'brayering off' palette paper 
and to the top left corner of this there's a sprinkling of mineral powder
Here's a close up of those fabulous speckles of white created by the Distress Resist spray ....
The broken twigs are from the gatherings of  recent 'wood walks'. They are bound with coarse fibres and add a 'natural' element to the tag. One sits at the top of the small tag
and the other, the larger one, sits above the sentiment
The large base tag is decorated with an old rusty can pull - again a 'find' when I've been 'stepping' out this summer. I always set out 'hands free' and almost always come home 'hands full'!  I can't resist a bit of 'Street Swag/ Boardwalk Booty' as I call it!  Sure you'll be seeing some feature in my future artwork.
The tag has great dimension with all the layers and chunky materials used
and I hope it makes you think of the Autumn/Fall season.
Full details of the challenge can be found over at That's Crafty challenge blog along with a gallery of inspirational projects made by the talented ladies on their design team.

I would like to enter my 'Forever Autumn' tag into the following challenges:
Stamps and Stencils- 'Its been a while'
Creative Artiste #42 Challenge : 'Anything Mixed Media Goes'

I'll be back tomorrow with a sneak peak of a project I have made for my GD weekly post so hopefully I will see you then and be able to tempt you over to That's Crafty's blog to see my project in full. 

Thanks for stopping by today. I really do appreciate you taking the time to visit, follow and comment.  

Hope you all have a lovely day 
Take care 
Amanda
x

Sunday, 30 October 2016

Tim Holtz 12 Tags of 2016- October

Hi Everyone and Welcome
Hope you are all doing ok and enjoying your weekend.
I'm here today to share my take on Tim Holtz 12 tags of 2016 - October . I began creating my tag a few days after Tim released it but unfortunately things got real messy here - I had a bad fall that left me with a very bad shoulder and arm injury  and I haven't been able to craft since .
Having spent what feels like the longest time not being able to do what I love I decided to at least try to finish off my Tim tag one handed! It wasn't easy and there was plenty of frustration and many expletives along the way but I am pleased to say I managed it and have a finished tag to share with you today .
Here it is
Tim's tutorial for this months tag can be found here and I've changed mine up only where supplies or spacing dictated.
Regions Beyond and Laboratorie Paper pads created my patchwork collage. They 're covered with a generous layer of Distress crazing medium.
Distress Crayon smudging around the paper pieces and on the crazing gives a grungier look and some paint splats too - tricky to do one handed!

The finished background before the zombie and ideology are added.
The Zombie die is embossed using the shattered embossing folder and given a grungy industrial look using Black Soot distress paint. He has a pewter conical bead eye- piercing!

and the ideology word band is also attached using pewter conical beads.

 Boris the spider seems to be quite happy dangling from a wire- no fear!!

and once again here's my 'one handed' take on Tim's October tag
It wasn't easy given my current state but I am pleased I have a tag to enter into 
I'm not sure how long it will be before normal service is resumed so I hope you will bear with me until then. Every days a new day right and hopefully with every new day I will be one day closer to healing!
Thanks for stopping by today. Your visits, comments and follows are much appreciated . 
Take care and 
Happy Halloween Everyone
Amanda 
xxx

Friday, 1 July 2016

Monochromatic- A Vintage Journey- July 2016

Hello Everyone and  Welcome
Hope you are all doing ok  and are all set for the start of a new challenge over at A Vintage Journey. Yes, believe it or not, another month has passed ( the clock just seems to be ticking so quickly this year) and its time to launch July's theme 'Monochromatic' hosted by Tracy. Heres what Tracy has to say
'I love Monochromatic themes in my artwork. I love the balance dlook it gives to a design. If you ever struggle with knowing what colours to usethis should be right up your street, one colour alone or hues of one colour(plus black and /or white- simple! Please just check that your entry is vintage, shabby, mixed media, art journalling, industrial, or steampunk to be in with a chance  of being a winner or a pinworthy mention .'
For my Monochromatic project I have drawn initial inspiration from a painting by Belgian Surrealist Artist Rene Magritte, The son of man and created a piece of wall art using some of Tim Holtz 2016 CHA new release products.
I have remained true to my love of the classic monochrome palette of black, white and grey/ silver. Admittedly my finished piece is more 'real' than 'surreal but that's where my creative muse led me- this time... 
Unfortunately I forgot to take a comprehensive set of step by step photos but I can provide you with the details of techniques/products used. 
So lets begin
I created a mask for the moon using a circle die. This was positioned and adhered to a pre-cut white card panel and remained in place until the background was complete, after which it was removed to reveal the moon.  
 Tim Holtz Wrinkle free Distress technique using Distress inks provided an initial layer of colour. More colour was then added using the distress inks with a blending tool.
Now to add some detail
That included some background stamping and whilst the jet black Archival ink was to hand the Evolution Man(as I am calling him) was stamped onto a separate piece of white card stock and cut out ready to position in place later
and some distress ink stencilling aswell as gesso stencilling for some added texture.
With the products and techniques covered time for some photos of the background panel
The gesso stencilling was enhanced with touches of silver gilding wax.
Some picket fence distress paint splatters made an appearance too. You know I love my splatters!
Moving onto the wood panel ....
This was cut to size by my new 'mate' at the local building merchants. I had a few panels cut at the same time, various sizes and they were unbelievably inexpensive costing little more than a standard chocolate bar here in the UK .So its worth checking out if you have any similar merchants in your area as those pennies saved on pricier shop bought mdf panels goes towards more craft supplies, right?
After sanding back the edges the panel was primed with gesso and then finger painted with Distress paints and Gesso. The corners and along the sides of the panel were crazed with Distress crayons blended into the crazing.
A couple of ideology arrows were added to the finished panel. 
Why arrows? Well lets see if I can share my thoughts : The arrow is a symbol of direction/movement/progress. Man is at the point of the arrow- the pinnacle of Evolution but in this ever increasing digital age will man be pierced by the arrow as it progresses further into the future?
Only time will tell I guess!

I hope my piece of wall art along with the fabulous projects offered by my fellow Creative Guides(which can be seen here at A Vintage Journey) will inspire you to go create and join in this months 'Monochromatic' fun.
I would like to enter this  into the following challenges 
Country View Crafts-July Challenge- Have fun with Circles  
Thats Crafty- Masculine Challenge 
The Craft Stamper- Take it Make it Challenge- July  - Take a Stamp: Anything Goes
That just leaves me to Thank you all for stopping by today.
 As always your follows, visits and comments are much appreciated and extremely valued. 
Hope you all have a lovely weekend 
Take care  
Amanda 
xxx